Here, tin24h.us will guide you how to optimize Blogspot A -> Z, hoping that after this article, people will have different perspectiv...
Here, tin24h.us will guide you how to optimize Blogspot A -> Z, hoping that after this article, people will have different perspective on Blogspot and find the right development for your Blog.
Optimize Blogspot tutorial I will include:
- Choose template. Editing meta tags.
- Edit the article title.
- Tools friendly URL. Creating Breadcrumbs for Blogspot.
- Create relevant information for each article.
- Create emoticon comment.
- Create a sitemap for Blogspot.
1. Select the template. Template is one of the important factors when using Blogspot, a good template is not only beautiful but also have a reasonable structure. This will helpyour SEO process a lot easier. Kool SEO personal experience , you should choose the template with 2 columns, the left post, the right is the widget: new posts new comment ... This is a common template and user-friendly.addition, an equally important factor, which is the heading tag structure. Most the Blogspot temp after installing located only a <h1>, and the title of the article is <h2> or <h3>. This will make it difficult for you to want to SEOan article. Many people have overcome this by inserting <h1> in this article, and still keep title is <h2> or <h3>.However, SEO Kool said this is not good. Firstly aesthetically beautiful, the second is the importance of heading tags because when google bot browsing your website, it will show pre <h2> card and <h2>, of course, not as important as <h1 >. So when you choose the template you need to pay attention to the structure of the temp, if available 2 card <h1>, an entire website, and a title for the wonderful article. If not, do not worry, SEO Kool will guide you to change the title articles into <h1> of the next step.
2. Edit the To edit tags <meta> tags meta keyword and meta description of the temple you find the following code
<meta name="description" content="" />
<meta name="keywords" content="" /><b:if cond='data:blog.url == data:blog.homepageUrl'>
<meta name="description" content="Mo described blog" />
<meta name = "keywords" content = "Keywords "/>
</ b: if>Edit the article's <title> card Usually when you write a new article, <title> your post looks like: Blog title: title of the article,
however, to simplify the SEO post, the submit your article title up front. For example: Text Articles | Blog Title
To do this you look to the code:
<title> <data:blog.pageTitle/> </ title><b:if cond='data:blog.pageType == "item"'>
<title> <data:blog.pageName/> | <data:blog.title/> </ title>
<b:else/>
< title> <data:blog.pageTitle/> </ title>
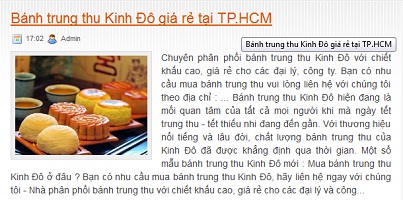
</ b: if>When you put your mouse on the article title, you will see the description for the link.

To do this do the following: Log in to Blogger -> edit HTML -> Extensions Locate the following line:
<a expr:href='data:post.link'> <data:post.title/> </ a><a expr:href='data:post.link' expr:title='data:post.title'> <data:post.title/> </ a><a expr:href='data:post.url'> <data:post.title/> </ a><a expr:href='data:post.url' expr:title='data:post.title'> <data:post.title/> </ a><b:if cond='data:post.title'>
<h3 class='post-title'>
<b:if cond='data:post.link'>
<a expr: href = 'data: post.link 'expr: title =' data: post.title '> <data:post.title/> </ a>
<b:else/>
<b:if cond='data:blog.pageType != "item"'>
<a expr: href = 'data: post.url'<b:if cond='data:blog.pageType != "item"'>
<b:if cond='data:blog.pageType != "static_page"'>
<b: if cond = 'data: post.title '>
<h3 class='post-title'>
<b:if cond='data:post.link'>
<a expr: href = 'data: post.link' expr: title = 'data: post.title' > <data:post.title/> </ a>
<b:else/>
<b:if cond='data:post.url'>
<a expr: href = 'data: post.url'
class = 'post-title'>
<b:if cond='data:post.link'>
<a expr: href = 'data: post.link'
class = 'post-title'>
<b:if cond='data:post.link'>
<a expr:href='data:post.link' expr:title='data:post.title'> <data: post.title /> </ a>
<b:else/>
<data:post.title/>
</ b: if>
</ h1>
</ b: if>. Post h3 {...}
. post h3 a,. post h3 a: visited {...}
. post h3 a: hover {...}. H1 post,. Posted h3 {...}
. post h1 a,. post h1 a: visited,. post h3 a,. post h3 a: visited {...}
. post h1 a: hover,. post h3 a: hover { ...}
4. Tools friendly URL.
Whenever you write new posts on blogspot, if you write the title of the full mark, sometimes the URL is displayed as follows:

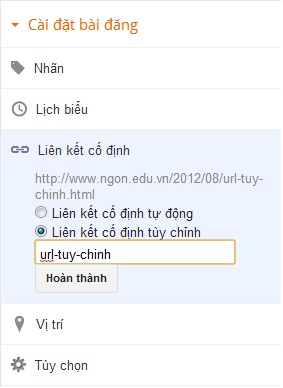
Here tin24h.usexperiment with the article titled: " U.S. Senator objected to control catfish ". Look at the picture you can see, compared to the original article title, the URL has been shortened and lost a number of characters.That's because the default URL's Blogspot has two functions: First: take always the title of the article as the URL for that article, but it can not understand English so was born the loss of a number of characters. Monday: Blogspot URL automatically truncated if the article title is too long. So if you want to have a friendly URL SEOstandards , we have to do? Very simple to solve for the two cases we can use the following two ways: - (a): When you write a new article, the original title was to not sign with the number of characters just enough so as not to shorten the URL and loss of character, and then publish the article and go back to edit the title became marked. - Method two: Use custom URL of Blogspot

With this feature you can freely adjust its URL. However, it should be noted that this feature is only adjusted once, ie after the publication of the article you can not edit the URL. So be careful when using. 5. Create Breadcrumb for Blogspot

To create Breadcrumb Blogspot, selected you to edit HTML and expanded utility. Then navigate to the code:
<b:includable id='main' var='top'>
  <! - posts ->
  <div class='blog-posts hfeed'>
    <b:include data='top' name='status-message'/>
<data:adStart/><b:includable id='main' var='top'>
<! - posts ->
<div class='blog-posts hfeed'>
<! - disable default status messages
<b: include data = 'top' name = 'status-message' />
default status message disabled ->
<b:include data='posts' name='breadcrumb'/>
<data:adStart/><b:includable id='main' var='top'><b:includable id='breadcrumb' var='posts'>
<b:if cond='data:blog.homepageUrl == data:blog.url'>
<! - No breadcrumb on front page ->
<b: else />
<b:if cond='data:blog.pageType == "item"'>
<div class='breadcrumbs'>
Browse »<a expr: href = 'data: blog.homepageUrl' rel = 'tag' > Home </ a>
<b:loop values='data:posts' var='post'>
<b:if cond='data:post.labels'>
<b: loop values = 'data: post.labels' var = 'label'>
<b:if cond='data:label.isLast == "true"'> »
<a expr:href='data:label.url' rel='tag'> <data: label . name /> </ a>
</ b: if>
</ b: loop>
»<span> <data:post.title/> </ span>
</ b: if>
</ b: loop>
</ div>
<b:else/>
<b:if cond='data:blog.pageType == "archive"'>
<div class='breadcrumbs'>
Browse »<a expr: href = 'data: blog.homepageUrl '> Home </ a> »Archives for <data:blog.pageName/>
</ div>
<b:else/>
<b:if cond='data:blog.pageType == "index"'>
<div class = 'breadcrumbs'>
<b:if cond='data:blog.pageName == ""'>
Browse »<a expr:href='data:blog.homepageUrl'> Home </ a>» All posts
<b:else/>
Browse »<a expr:href='data:blog.homepageUrl'> Home </ a>» Posts Filed under <data:blog.pageName/>
</ b: if>
</ div>
< / b: if>
</ b: if>
</ b: if>
</ b: if>
</ b: includable>]]> </ B: skin>. Breadcrumbs {
padding: 5px 5px 5px 0px;
margin: 0px 0px 15px 0px;
font-size: 95%;
line-height: 1.4em;
border-bottom: 3px double # e6e4e3;
}First we find the </ head> and add before it the following code:
<b:if cond='data:blog.pageType == "item"'>
<script type="text/javascript">
/ / <! [CDATA [
var titles = new Array (); var titlesNum = 0; var urls = new Array (); var time = new Array (); function related_results_labels (c) {for (var b = 0; b <c.feed.entry.length; b + +) {var d = c.feed.entry [b]; titles [titlesNum] = d.title. $ t; {for (var removeRelatedDuplicates () {var b = new Array (0); var c = new Array (0); e = new Array (0); for (var contains (b, d) {for (var c = 0; c <b.length; c + +) {if (b [c] == d) {return true}} return false} function printRelatedLabels (a) {var y = a.indexOf ('? m = 0'); if (y! = -1) {a = a.replace (/ \? m = 0 / g, ")} for (var b = 0; b <urls. length; b + +) {if (urls [b] == a) {urls.splice (b, 1); titles.splice (b, 1); time.splice (b, 1)}} var c = Math.floor ((titles.length-1) * Math.random ()); var b = 0; document.write ("<ul>"); if (titles.length == 0) {document.write ("<li> There are no posts related href = "'+ urls [c] +'"<div class='post-footer'><b:if cond='data:blog.pageType == "item"'>
<div id='related-posts'>
<b> Related Articles: </ b>
<b: loop values = 'data : post.labels' var = 'label'>
<script expr: src = '"/ feeds/posts/default/- /" + data: label.name + "? alt = json-in-script & callback = related_results_labels "'type =' text / javascript '/>
</ b: loop>
<script type='text/javascript'> var maxResults = 5; removeRelatedDuplicates (); printRelatedLabels ('<data:post.url/>' ); </ script>
</ div>
</ b: if>7. Create emoticon when commenting on Blogspot
Insert the following code before the closing </ body>:
<script type='text/javascript'>
/ / <! [CDATA [
function replaceText () {if (! document.getElementById) {return;}
bodyText = document.getElementById ("emocomments");
theText = bodyText.innerHTML;
theText = theText.replace (/: \) \) / gi, "<img src='http://lh4.ggpht.com/_u7a1IFxc4WI/TM-vt_XVZKI/AAAAAAAAATI/Q35_W0anT6A/21.gif'/>");
theText = theText.replace (/ = d> / gi, "<img src='http://lh6.ggpht.com/_u7a1IFxc4WI/TM-vzUt1yQI/AAAAAAAAATY/QHNvnj0gYbU/41.gif'/>");
theText = theText.replace (/: d / gi, "<img src='http://lh3.ggpht.com/_u7a1IFxc4WI/TM-voxnkRKI/AAAAAAAAAS4/PjDn098vm3w/4.gif'/>");
theText = theText.replace (/: p / gi, "<img src='http://lh6.ggpht.com/_u7a1IFxc4WI/TM-vpDb68dI/AAAAAAAAAS8/Yv0Uu3qzG_Q/10.gif'/>");
theText = theText.replace (/: \ (\ (/ gi, "<img src='http://lh4.ggpht.com/_u7a1IFxc4WI/TM-vt5z16MI/AAAAAAAAATE/Hx-7Thmr6do/20.gif'/>");
theText = theText.replace ( /: \) / gi, "<img src='http://lh6.ggpht.com/_u7a1IFxc4WI/TM-voiNIw2I/AAAAAAAAASw/aav2hwqeG0c/1.gif'/>");
theText = theText.replace (/: \ (/ gi, "<img src='http://lh6.ggpht.com/_u7a1IFxc4WI/TM-voq7QQnI/AAAAAAAAAS0/UzoFJOCcPPU/2.gif'/>");
theText = theText.replace (/: - \ ? / gi, "<img src='http://lh5.ggpht.com/_u7a1IFxc4WI/TM-vua5MF2I/AAAAAAAAATU/N4X-ouMd1-I/39.gif'/>");
theText = theText.replace (/ \ [\ - \ (/ gi, "<img src='http://lh6.ggpht.com/_u7a1IFxc4WI/TM-vuMg6RQI/AAAAAAAAATQ/rWj7euuKOZs/33.gif'/>");
theText = theText.replace ( /: -o/gi, "<img src='http://lh6.ggpht.com/_u7a1IFxc4WI/TM-vpLiW1GI/AAAAAAAAATA/fPyPJcBks7s/13.gif'/>");
theText = theText.replace (/: -t/gi, "<img src='http://lh3.ggpht.com/_u7a1IFxc4WI/TM-vz4hwcNI/AAAAAAAAATo/4ySXuvQWma8/104.gif'/>");
theText = theText.replace (/:-ss / gi, "<img src='http://lh4.ggpht.com/_u7a1IFxc4WI/TM-vzUOH79I/AAAAAAAAATc/oNE5H5vcNtI/42.gif'/>");
theText = theText.replace (/ b-\ (/ gi, "<img src='http://lh6.ggpht.com/_u7a1IFxc4WI/TM-vzrqI4MI/AAAAAAAAATk/BhfFnT0Gbro/66.gif'/>");
theText = theText.replace (/ @ - \) / gi , "<img src='http://lh6.ggpht.com/_u7a1IFxc4WI/TM-vziH8NXI/AAAAAAAAATg/2evEbN2cJwc/43.gif'/>");
theText = theText.replace (/ = \) \) / gi , "<img
= TheText;
} replaceText ();
/ /]]>
</ script><b:loop values='data:post.comments' var='comment'><div id='emocomments'></ B: loop></ Div><data:blogTeamBlogMessage/><script type="text/javascript">
/ / <! [CDATA [
function moreSmilies () {
document.getElementById ('smiley-more'). style.display = 'inline';
document.getElementById ('smiley-toggle' ). innerHTML = '<a href = "javascript: LessSmilies () "> ← </ a> </ span> ';
}
function lessSmilies () {
document.getElementById ('smiley-more'). style.display = 'none';
document.getElementById ('smiley-toggle '). innerHTML =' <a href = "javascript: MoreSmilies () "> → </ a> ';
}
/ /]]>
</ script>
<div class='emoticons'>
<img src = 'http://lh6.ggpht.com/_u7a1IFxc4WI/TM- voiNIw2I/AAAAAAAAASw/aav2hwqeG0c/1.gif '/> :)
<img src='http://lh6.ggpht.com/_u7a1IFxc4WI/TM-voq7QQnI/AAAAAAAAAS0/UzoFJOCcPPU/2.gif'/>: (
<img src = 'http://lh4.ggpht.com/_u7a1IFxc4WI/TM-vt_XVZKI/AAAAAAAAATI/Q35_W0anT6A/21.gif' /> :))
<img src = 'http://lh4.ggpht.com/_u7a1IFxc4WI/TM- vt5z16MI/AAAAAAAAATE/Hx-7Thmr6do/20.gif '/>: ((
<img src='http://lh6.ggpht.com/_u7a1IFxc4WI/TM-vuJ1G41I/AAAAAAAAATM/_jLHXvz6PTg/24.gif'/> =) )
<span id='smiley-more' style='display: none;'>
<img src='http://lh6.ggpht.com/_u7a1IFxc4WI/TM-vzUt1yQI/AAAAAAAAATY/QHNvnj0gYbU/41.gif'/> = D>
<img src='http://lh3.ggpht.com/_u7a1IFxc4WI/TM-voxnkRKI/AAAAAAAAAS4/PjDn098vm3w/4.gif'/>: D
<img src = 'http://lh6.ggpht.com / _u7a1IFxc4WI/TM-vpDb68dI/AAAAAAAAAS8/Yv0Uu3qzG_Q/10.gif '/>: P
<img src='http://lh6.ggpht.com/_u7a1IFxc4WI/TM-vpLiW1GI/AAAAAAAAATA/fPyPJcBks7s/13.gif'/> :-O
<img src='http://lh5.ggpht.com/_u7a1IFxc4WI/TM-vua5MF2I/AAAAAAAAATU/N4X-ouMd1-I/39.gif'/>: -?
<img src = 'http:// lh4.ggpht.com/_u7a1IFxc4WI/TM-vzUOH79I/AAAAAAAAATc/oNE5H5vcNtI/42.gif '/>:-SS
<img src = 'http://lh3.ggpht.com/_u7a1IFxc4WI/TM-vz4hwcNI/AAAAAAAAATo/4ySXuvQWma8/ 104.gif '/>:-t
<img src='http://lh6.ggpht.com/_u7a1IFxc4WI/TM-vuMg6RQI/AAAAAAAAATQ/rWj7euuKOZs/33.gif'/> [- (
<img src = 'http: / / lh6.ggpht.com/_u7a1IFxc4WI/TM-vziH8NXI/AAAAAAAAATg/2evEbN2cJwc/43.gif '/> @ -)
<img src = 'http://lh6.ggpht.com/_u7a1IFxc4WI/TM-vzrqI4MI/AAAAAAAAATk/ BhfFnT0Gbro/66.gif '/> b-(
</ span>
<span id='smiley-toggle'> <a href = "javascript: MoreSmilies () "> → </ a> </ span>
</ div>]]> </ B: skin>. Emoticons {-moz-background-clip:-moz-initial;-moz-background-origin:-moz-initial;-moz-background-inline-policy:-moz-initial; text-align: left;}
. emoticons a,. emoticons a: hover {font-size: 28px; margin-left: 20px; text-decoration: none;}8. Create Sitemap for Blogspot Blogspot first 2 Sitemap format is used to submit sitemap to Google Webmaster Tools (sitemap for Googlebots), the second is sitemap.html for users. To create sitemap for Googlebots, you only need Google Webmaster Tools, navigate to submit sitemap and add the following code into the text box:
atom.xml? redirect = false & start-index = 1 & max-results = 500
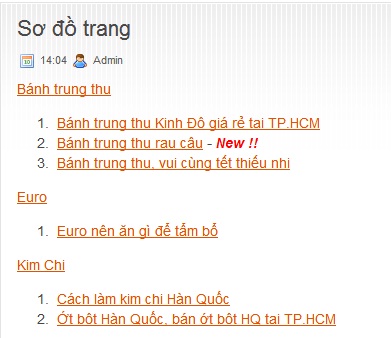
To do the above, you create a new page in my blog and give it a name any, here tin24h.us named: Sitemap. then you switch to HTML mode and insert the following code:
<script style="text/javascript" src="http://www.abu-farhan.com/script/daftarisiblogger/blogtoc-min.js"> </ script>
<script


No comments: